Steps for configuring Snowflake
Follow these steps to set up a Snowflake destination:
-
Create a new database in Snowflake.
-
Connect to the database using any Snowflake-supported SQL editors and execute the queries mentioned in steps #3, #4, #5, & #6 by replacing the below placeholders with the appropriate values:
-
Replace <DATABASE> placeholder with the name created in step #1
-
Replace <WAREHOUSE> placeholder with the compute warehouse available in the Snowflake dashboard/console under Admin > Warehouse.
Feel free to reach out to us at help@intentwise.com if you run into any issues or if you have any questions.
-
-
Now, create a new user & role, and assign this new role to the new user
USE ROLE accountadmin;
CREATE ROLE intentwise;
CREATE USER intentwise DEFAULT_ROLE = intentwise;
GRANT ROLE intentwise TO USER intentwise -
Next step is genrating a private key. To start, open a terminal window and generate a private key.Generate Private KeyYou can generate either an encrypted version of the private key or an unencrypted version of the private key.
- To generate an unencrypted version, use the following command:
openssl genrsa 2048 | openssl pkcs8 -topk8 -inform PEM -out rsa_key.p8 -nocrypt- To generate an encrypted version, use the following command, which omits
-nocrypt:
openssl genrsa 2048 | openssl pkcs8 -topk8 -v2 des3 -inform PEM -out rsa_key.p8The commands generate a private key in PEM format and will look like below-----BEGIN ENCRYPTED PRIVATE KEY-----
MIIE6T...
-----END ENCRYPTED PRIVATE KEY-----Generate Public Key- From the command line, generate the public key by referencing the private key. The following command assumes the private key is encrypted and contained in the file named
rsa_key.p8.
openssl rsa -in rsa_key.p8 -pubout -out rsa_key.pub- The command generates the public key in PEM format.
-----BEGIN PUBLIC KEY-----
MIIBIj...
-----END PUBLIC KEY-----Store the private and public keys securely
Copy the public and private key files to a local directory for storage. The file should still be protected from unauthorized access using the file permission mechanism provided by your operating system. It is your responsibility to secure the file when it is not being used.Assign the public key to a Snowflake user
Execute an ALTER USER command to assign the public key to a Snowflake user.ALTER USER example_user SET RSA_PUBLIC_KEY='<PUBLIC KEY>';Note:- Only owners of a user, or users with the SECURITYADMIN role or higher can alter a user. For more information, see Overview of Access Control and GRANT OWNERSHIP
- Exclude the public key delimiters in the SQL statement.
-
Next, create the schemas in the database
CREATE SCHEMA "amazon_source_data";
CREATE SCHEMA "intentwise_ecommerce_graph";CREATE SCHEMA "amazon_marketing_cloud" (recommended if you are currently using or intend to use Amazon Marketing Cloud)
CREATE SCHEMA "criteo_source_data" (recommended if you are currently using or intend to use Criteo)
CREATE SCHEMA "instacart_source_data" (recommended if you are currently using or intend to use Instacart)
CREATE SCHEMA "walmart_source_data" (recommended if you are currently using or intend to use Walmart)
Please run the following statements for each database you’d like intentwise to access: -
Execute the below queries to grant access, create, and all privileges to intentwise user to perform changes on the schema and associated tables
GRANT USAGE ON DATABASE "<DATABASE>" TO ROLE intentwise;
GRANT CREATE SCHEMA ON DATABASE "<DATABASE>" TO ROLE intentwise;
GRANT ALL ON SCHEMA "intentwise_ecommerce_graph" TO ROLE intentwise;
GRANT ALL ON SCHEMA "amazon_source_data" TO ROLE intentwise;
GRANT ALL ON SCHEMA public TO ROLE intentwise;
GRANT ALL ON ALL TABLES IN SCHEMA "<DATABASE>"."intentwise_ecommerce_graph" TO ROLE intentwise;
GRANT ALL ON ALL TABLES IN SCHEMA "<DATABASE>"."amazon_source_data" TO ROLE intentwise;
Please run the following statements for each warehouse you’d like intentwise to use: -
Execute the query below to allow intentwise to use a WAREHOUSE
GRANT ALL ON WAREHOUSE "<WAREHOUSE>" TO intentwise;
-
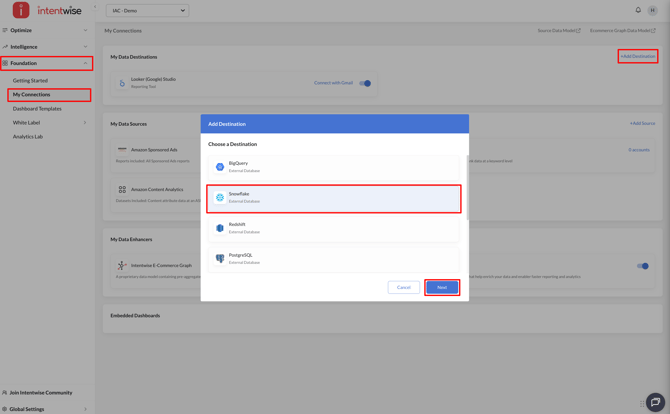
Now, login to the Intentwise platform and navigate to My Connections under Foundation. Click on "+ Add Destination", choose Snowflake as the destination, and click Next.
-
Enter the Account Name, Username, Private Key, Pass Phrase (optional), Database Name, Warehouse, Region, and click on Save.

-
Account Name field value here corresponds to the 'Locator' value. You will be able to find the 'Locator' details under Admin > Accounts in the Snowflake console.

-
Username and Database field values here correspond to the ones you created in Steps #1 & #3 above
-
Warehouse field values corresponds to the Warehouse name in Snowflake and it can be found in Admin > Warehouses in the Snowflake console.

-
Finally, 'Region' field value is a combination of the 'Cloud' and 'Region' values (Joined using Hyphen '-' ) in the Snowflake console. For example: If Cloud = AWS and Region = US West (Oregon), then Intentwise Region field value = AWS-US West (Oregon)
You will be able to find the 'Cloud' & 'Region' details under Admin > Accounts in the Snowflake console.

-
-
On successful completion, you will see this message:

-
For any further questions on the pipeline setup, please reach out to us on chat or at help@intentwise.com.